Showing posts with label Kripa. Show all posts

Wednesday, 30 December 2015

Washi tape mini Canvas & Au revoir

Hello creatives,

Kripa here, with my final project as DT for Lulupu - a mini canvas based on the theme this month
Deck up your Home with washi tape + mod podge
(Click here to read the full post on the challenge)

The first layer is pattern paper and torn strips of washi tapes (
Glitter Light Gold Japanese Washi Tape, Gold Script Japanese Washi Tape) on a Kraft base. Next is a layer of texture paste through a stencil. Finally, more pieces of torn washi tape and some embellishments.


Washi strips added just the right interest to the background, enough to not use any stamping at all! The challenge with using washi was that it wouldn't stick on texture paste and because I used small torn strips it was even more difficult keeping them down on the bumpy textures. Mod Podge Matte 4 oz came to my rescue, as it dries transparent, you can't even see it and those tiny pieces of tape will stay there forever! You have two more days to link your entries for this month's challenge here.

Its now time to say my final goodbyes. I've had a wonderful journey last two years with a very talented bunch of fellow designers and so much love from all of you for which I'm ever grateful. A huge thank you to Karuna, who trusted me (more than I did) with an invitation to join her DT at the time when I had just started scrapbooking. I will miss working with you.

Here are my favourite projects from this year.

This mini album is definitely top of the list for me as I discover the possibilities of creating interest with textures (minus wet media) You can see all the pages here and tutorial here.

Memory keeping is what attracted me to scrapbooking in the first place and I'm thoroughly enjoying creating in this altered book journal. You can see two more pages of this book here and here.

This year I made more cards than layouts. Click here to see closies of each card.

Another card which I really enjoyed making. Wish I had an endless supply of these cherubs. You can read through the tutorial here.

Finally, a reverse canvas inspired by the sea. More pictures and details here.

When I was going through my projects trying to choose favourites, it was easy to see how much my style has evolved through my time as a Lulu Pooh thanks to encouragement from my wonderful fellow DTs - Manu, Tanvi, Neha, Dolly and Karuna and all of you who read my posts and leave me comments - they mean so much to me.

I will continue to share my art journey on my blog - theColourPress and will be super thrilled if you visit me there.

Wishing you all a joyous 2016.

Au revoir,
Kripa


Friday, 11 December 2015

Christmas Canvas with modpodge and washi tape

Hello friends,

Kripa here with my take on this month's challenge
(Click here to read the full post on the challenge)


My take is a Christmas themed canvas that can be used as a table décor.


The background is a Christmas themed gift wrap tissue glued down with mod podge and white gesso. Next Iore several pieces of washi tape - Gold Dotted Japanese Washi Tape, Gold Script Japanese Washi Tape, Glitter Light Gold Japanese Washi Tape before applying clear embossing paste through a stencil. Once dried, add more torn washi tape for extra texture and black to balance.


Also used washi tape to cut out paper bows for embellishments.


Supplies from the store:
Mod Podge Matte 4 oz
Gesso - Sakura Acrylic Tube
Glitter Light Gold Japanese Washi Tape
Koi Water Brushes Medium
Gold Dotted Japanese Washi Tape
Gold Script Japanese Washi Tape

Monday, 16 November 2015

Mini Album Tips - Maximise photo space

Hello friends,

Today, I'm back to share more about each page of the mini album posted a few days ago for this month's challenge
The earlier post had details of how to make the base of the album and embellishments, today's post is about how 4 pages can hold 20 photographs.
Tip 1: This is a really simple one. Make a pocket that goes half way through the page using lace. The base can be used to journal and the pocket holds a tag with photos on both sides. I would not put more than one tag in this pocket to ensure the seams don't tear or fold plus it's easy to put in and pull out the tag. Another idea is to tie a set of tags together with ribbon and add it inbetween pages. While the front can be used to journal or as is, the back of the tags can have photographs.
Tip2: Flip-open page held by washi tape can be used to add some hidden journaling or extra photographs. Simply use some washi tape over the edge of a piece of paper to make a hinge.
Tip3: Folded pages can be used for more photographs and journaling. Simply fold a rectangle in half, tie it close using a string or ribbon. For the recipient to know there is a fold, Ive used either arrows or tabs on the inside.
Here are the pages with the folds open. Inside one of the folded pages, I've added a small pocket and two tiny tags.
 Tip4: This fold is slightly different. Score a square piece of paper across the middle (making a plus so that you have 4 smaller squares), cut off one of the squares. Fold along the scored lines and you will get one 'side' opening and one 'top' opening fold.
The rest of the pages are single photo pages and can be seen here.

Through the rest of this month, the DT will be sharing ways of including more photos, so visit back often. 

Until my next post,
Happy Crafting!

Cheers,
Kripa


Monday, 2 November 2015

Challenge #55 - Make a Mini + Tutorial

Hello creatives,

Lets start with a round of applause for all who joined us last month - 53 gorgeous entries! I hope you all feel as motivated and enthusiastic about this month's theme

Make a Mini

(Click here to read all challenge rules)
Special rules for this challenge:
1. Construct a mini, don't use a ready available album (example mdf album)
2. You can use any binding, any theme
3. Submit entries by 30 November, 2015, 11.55pm IST

The challenge winner will receive a goodie bag from Lulupu.

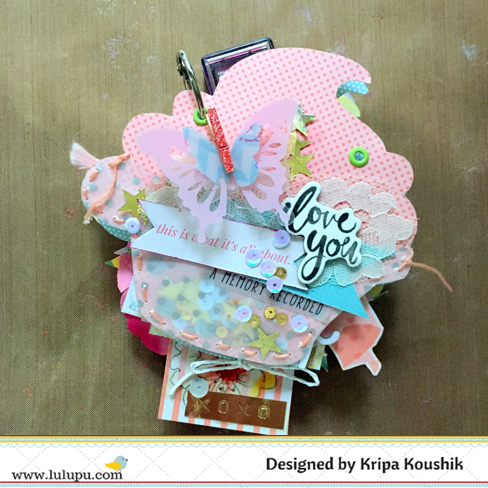
Ive made a cupcake shaped mini album and have a tutorial on creating the cover page and tips for decorating your albums.  Its not long post, but hope it brightens up your Monday :)
Are you ready to get started? Here is how the cover came into being.
Step1: Using a template, cut out cupcake outlines from Simple Life Echo Park 6x6 papers. These are double sided, so you already have a background for the other side.
Step2: Trace only the base of the cupcake ( not the cream) onto vellum or acetate. Handstich the vellum to one of the cupcake cutouts, I forgot to click, but you'll understand what I'm talking about in a minute. Fill it up with sequins - gold, grey. Ive also added some star confetti.
Step5: Seal shut with double sided tape. This part is a bit tricky, but patience pays :) in the form of clean finishing. You will now have something like this ( minus eyelets and stickers)

Next step is to create the focal points for each page aka embellishments. This was by far the most enjoyable and time consuming part of the project.
Ive used crate paper open book 12x12 papers and the ephemera pack and they matched  the colour theme quite well. My two tips when it comes to embellishments:
1. Mix and match  whatever is in your stash.
2. Layering - Experiment with combining  different materials  - lace, vellum, chipboard, acetate
Some details- the clothespin holding the butterfly had been glittered using the fine tip zig pen, the pinwheel  is held together  with American crafts glitter brad, the big heart sticker has an action wobble below it and finally the little moments base comes from Maggi Holmes ephemera packaging.
Can you see gold tape peeking through some of the layers- totally in love with this tape.

Using the crop-a-dile, attach green eyelets to all the pages. Finally assemble all the pages. Here is a close up of the pages.
  
And the other side.


In my second post this month, I will be taking you through more details of each page.
Supplies from the Lulupu store:


  Linkup


Friday, 23 October 2015

A page from my altered book

Hello peeps,

A quick and short post to share another page from my altered book. The right side page has been folded diagonally to form a pocket for big photographs.


The background has embossed doilies with clear and gold embossing powders. Embossing resists paint and offers an interesting background to add mists or paints on.
We have had some beautiful inspiration from the DT this month for the Magic with embossing. Challenge. You can link your entries here.

Supplies from the store:
Maggie Holmes Ephemera Cardstock Die-Cuts 81/Pkg
Embossing Powder Clear 1oz
Embossing Powder Gold Glitter 1oz
Little Lindy- HOTTIE PATOTTIE
Gold Script Japanese Washi Tape
Gesso - Sakura Acrylic Tube


Wednesday, 7 October 2015

Embossing Magic - Card Tutorial

Hello crafty peeps,

Let me start by congratulating the winners of the Sparkle and Shine challenge. We thank all of you who participated and appreciate the time and love you put into your work and are ever so happy and grateful that you share your projects with us.
Hope to see you all play along with this months challenge

Embossing Magic

Click here to read challenge guidelines and here for more about this months challenge.

My first exposure to heat embossing was in a craft fair demonstration and my eyes literally popped when the powder melted.... as if by magic. Embossing is a very handy technique that can be used in many ways, which the DT will share throughout this month. My project this time is a trio of autumn coloured cards along with a pictorial.

The pictorial below is for the card titled 'grateful'. The other two cards have been made using the same techniques.

1. Glue strips of tissue onto the sides of a piece of watercolour paper. Spread a thin layer of gesso, remove excess gesso with a dry baby wipe. Dry.
2. On the craft mat, dribble a few drops of mist, give a light spray of water and swipe the edge of the paper over it. Dry.
3. Repeat with another colour. I've used a few shades of yellow and orange mists.
4. Stamp using a Kaisercraft texture stamp using archival ink. Archival ink is a must have for mixed media stamping. The ink is waterproof and wont smudge and react with water and mists.
5. Prepare another piece of watercolour paper using the steps 2-4.Additionally, spray a darker orange/red mist through stencil.

6. Cut out leaves and words using the paper prepared on the Silhouette Cameo.
At this stage, I wanted to add some dimension on the base and leaves and embossing powder seemed the best option to keep a clean look and infusing some additional colour and texture. On this scrap paper you can see the red glitter embossing powder shining after heat setting. There is very subtle difference between the black and clear powders.
7. Using versamark watermark pad, stamp onto black cardstock. Pour black embossing powder in the middle and clear powder on the sides. Heat set with a heat gun till the powder melts.
8. Similarly, emboss the leaves with gold and red embossing powders.

9. Finally, mat all the layers and glue the word grateful and leaves using Zig fine tip glue pen.

Using the same techniques, these two variations were prepared.

Tip: For tiny, shiny splatters, dip a small brush in undiluted acrylic paint, hold it a few inches asay from the paper and tap it with a pen. As the paint is not watery, you will need to tap a bit harder for shiny droplets. The camera hasnt captured the glitter from the pearl acrylic on these cards. 

That is it from me today. If you've never tried embossing before, Lulupu has a new range of embossing powders available in the store.

Supplies from the store
Embossing Powder Black Glitter 1oz
Embossing Powder Clear 1oz
Heat It Craft Tool Europeon Version

Fine Tip - Zig 2-Way Glue Pen
Heidi Swapp Silicone Craft Mat 18"X24"
Scor-Tape 5"X27yd
Embossing Powder Red Glitter 1oz
Embossing Powder Gold Glitter 1oz
VersaMark Watermark Stamp Pad 1
Little Lindy- CHRISTMAS

Tuesday, 22 September 2015

Sparkle and Shine - journal book page

Hello friends,

Hope you've all had a great start to this week. 25 gorgeous entries this month, there is time for you to add another if you want. You can read more about the Sparkle and Shine challenge here.

Here is my contribution to your daily dose of art inspiration - another special memory recorded in an altered book journal. Memory keeping isn't always about photographs (at least for me), its about documenting those little things that bring me joy everyday. My page today is about something I learned from my little boy!

The background was prepared by using gesso and a tiny bit of paint. Paper layering on both pages have been made using the gorgeous Maggie Holmes Open Book paper and ephemera. There are so many pretty patterns and text, I'm in love with this range and just can't seem to stop creating with it. Finally, to finish some studio calico sequins have been added between the layers. Easy isn't it.

Wont you join us this month with a sparkling creation of your own?

Supplies from the lulupu store:
Modelling Paste - Sakura Acrylic Tube
 Maggie Holmes Open Book Paper Pad 12"X12" 48/Pkg
Black & Gray Essentials Sequins 8mm 6g
Aleene's Tacky Glue Clear 4oz
Koi Water Brushes Medium
Ephemera Cardstock Die-Cuts 81/Pkg
 

Thursday, 10 September 2015

Sparkle and Shine - Coffee Cards

Hello mateys,

How has the week been progressing for you? Its getting warmer here in Sydney, spring is in the air and in my mood. This month Lulupu's challenge for you is to create a project with
There are so many products that you can use to add some shine to your projects - the good old rhinestone, sugar dots, more trendy sequins, glitter. Don't forget Heidi Swap colour shine mists, ranger perfect pearls, wink of Stella..... the list goes on.
 
Today I want to share 3 cards with you all, mixed media style of course. All of them are made with Prima Coffee Break papers, wood embellishments, stamps and medium.

The background was prepared using strips of torn paper, gesso, a bit of lace, stencilling using the prima bubble stencil and finally a sticker from the same collection. Watercolours were added after that and finally when everything was dry, mix glass glitter with gel medium and apply. Gel medium dries clear, meaning you can see the paint and layers underneath giving a very interesting effect.

For this card, start by applying 3d gel through prima stencil, before the gel dries, sprinkle glitter over it. You can combine two or more glitters too for more depth. Allow to dry completely, else the glitter will stick to your fingers and come off. Places where the glitter didn't stick, the 3d gel medium gives a see through embossed kind of effect.
My final card is very simple. Ive used the traditional rhinestone to add colour to an otherwise coffee coloured card.
The Lulupu store is open again and brimming with new supplies. Have a browse through and you may get more ideas of products that sparkle and shine to use in you creation.

Supplies from the Lulupu Store:
FaberCastell Mix & Match Color Gelatos Set Tropical 4pc
Bubbles Elementals Stencil 6.5"X10.25"
Archival Dye Ink - Jet Black
Broken China Distress Ink Pad
Coffee Archival Ink
Coffee Break Paper Pad 6"X6" 30/Pkg
Martha Stewart Glitter Tinsel Iridescent 12pc
Coffee Break 3D Stickers


Monday, 17 August 2015

CASE this sketch - Memory Keeping (Tutorial)

Hello friends,

Hope you are all having a great month and enjoying the gorgeous baby themed creations that the DT have showcased and also the entries that have been linked. For the rest of the month, the DT will be playing with a sketch and sharing with you all our different interpretations of it. But don't forget, there is time till the end of the month to link projects for Baby - a little bit of heaven here.
 
Today, I'm sharing with you a step by step on how this page was created in my altered book journal.
Our very talented DT Tanvi Shah prepared this sketch. Are you able to see how I was inspired by it. The circle has been replaced with a heart and the speech bubble by the title. When interpreting a sketch, its alright to interchange the shapes and add a few extra elements, while still maintaining the basic look and feel of the sketch. 
 
 
A few days back, I bought an old book from the library and prepared it to use as a journal to record some very special memories. After all memory keeping is not just about photographs. This is the first page I made in this book. You can find many tutorials on the www on how to alter a book, but don't hold back your questions, will be very happy to answer them. Here is a step by step on how this page was prepared. I usually spend 3-8 hours on a layout, this one took about an hour, so a big tick for me to complete this album.
 
1. Start with a layer of gesso. If your gesso is too thick, spread it with an old credit card instead of a foam brush, don't use water as the pages are old and may crumple very easily. On the wet gesso, blend in two shades of pink, I've used fevicryl pearl paint. Now dry completely.
 
2. Open lindy sprays bottles ( product lost at the end of the post). Using the tube tip, draw the outline of a heart. Need not be perfect, intersecting lines give more interest than a traced outline.
 
3. Some random stripes of washi tape. Tear it up so they are not all even width.
 
4. Time to add colour. First rub some gelato on a piece of plastic (packaging of a stamp). Add a tiny amount of water, splat the plastic paint side down on the background. Repeat the same with mists.I even stamped randomly on the page using the leftover paint instead of a stamp pad.
 
5, 6. Layer strips of pattern paper (Heidi Swapp Dreamy) and a doily. Add more colour using the same plastic piece. Do you see the strips with circles punched through? I stuck a few different washi tapes on a strip of scrap paper and punched circles through it.
 
Time for embellishments. Layer some uber gorgeous pieces from Open Book ephemera pack, wood veneer, enamel dots, stickers and more stamping with archival ink. After sticking down the photograph redraw the part of the heart that got hidden behind the layers. Add journaling. All Done!
 
Thank you for visiting us today, come back later this week to see another interpretation of this sketch.
 
Wish you a great start to the week,
Hugs,
Kripa
 
Supplies from the Lulupu store:


Wednesday, 5 August 2015

An Easel Photo display with Drawer

Hello friends,

Let me start by congratulating the winners of last month's challenge. You can see the winning entries here. We love visiting all of our participant blogs, sharing the joy of paper crafting and look forward to your entries for this month's theme
 
BABY - A little piece of heaven
Click here for the full post and our generic challenge guidelines can be found here.
 
My paper crafting aspiration this year is to try new techniques and styles. When I went through my box of projects, most were mixed media, so for this post, I've tried my hand at a traditional card which involves loads of measurements, both unfamiliar to me.

This what my project looks like.


The pink mat is a magnetic photo mat and can be fixed onto the base paper (music paper) both vertically and horizontally to accommodate any photo layout. This easel drawer photo display would make a perfect gift to new parents, or grandparents to show off adorable new baby wallet size photographs.

The drawer measures 6x6 and has room to accommodate loads of photographs and even a gift. This is the view from the top, with the display lying flat on the box. Because the box was made to a specific dimension, there was a lot of measuring required. The drawer, and base of the card are white medium weight chipboard. The Tim Holtz ruler is perfect for precise measurement and Art Knife by WRMK made cutting chipboard easy.
 
The pattern papers, die cuts, drawer pull and flowers are all Kaisercraft Pitter Patter collection. The banner was cut from left over scraps and the WRMK crop-a-dile punched tiny circular holes just enough to thread a twine.


All the different layers have been popped up using foam tape. Apart from paper flowers, tucked in between the layers is a resin flower . Ive also embossed a stitch stamp around the border of the card.
That's it from me today. I hope you al feel encouraged to try something that not your usual style. You can link your baby theme creations here.

Until next time,
Take care,
Kripa

Materials from the store
Tim Holtz Idea-Ology Design Ruler 12"
Art Knife By We R Memory Keepers
Pitter Patter Kaisercraft Paper Pad 6.5"X6.5" 40/Pkg
Crop-A-Dile Hole Punch & Eyelet Setter
Gold Super Fine Embossing Powder 1oz
 Heat It Craft Tool Europeon Version
VersaMark Watermark Stamp Pad 1
Blossoms 1 Resins embellishments
 

Thursday, 16 July 2015

CAS Cards - Mixed Media style

Hello crafty friends,

How are you all today?
Its mid month and the design team have revealed their interpretations of this months challenge - Anything but square or rectangle. You can read more about the challenge here.
Have you linked your creation yet?

Through the rest of this month, the team has decided to showcase CAS cards. CAS stands for Clean and Simple. This means a card with lots of empty space, minimal layers or embellishments, in other words uncluttered.

CAS is definitely out of my comfort zone, but once I started, found it hard to stop. Today, I'm sharing three cards from the lot I made, hopefully managed to find a balance between CAS design and my love for mixed media art.

 
For all my cards, the background was created by using gesso + white sand texture through a stencil. Gesso ensures that the texture paste gets a bright white color on drying to match the white card stock.  
 On this one, as there is a contrast already between the texture paste and kraft card stock, no paints were needed, just some embellishments. 

On this card, the tiniest amount of watercolors were used through a waterbrush to infuse some color before embellishing with gold stars, title and vellum snowflakes.

I usually make a few card bases together and experiment with different techniques and color combinations. One such piece of card stock was used to cut the three Christmas trees and another such piece was used to mat the card on.The words have been heat embossed with gold embossing powder after stamping with versamark watermark stamp pad.

Thank you for visiting us today. 

Don't forget to check back in a couple of days for more CAS card creations from the rest of the team.

Cheers,
Kripa

Products used from the Lulupu store: