Monday 31 August 2015

CASE this sketch - Mixed Media Layout

Hello dear crafters, 

How are you all doing. Are you all enjoying the challenge this month - Babies - A lil bit of heaven :) 


Do check out the post and link your entries to win an awesome goodie bag from Lulupu. 


For this post, we have a CASE sketch from Tanvi, which  I have interpreted in the canvas layout. 


Here is the full look of the layout. I have used pattern paper on canvas along with some stencilling and use of gelatoes. The focus of the canvas is the picture which I have laid out on a die cut circle. To add some interest, I have used some ceramic flowers, and lace trims from my personal stash and some pearl embellishments. The sentiments are die cut and coloured with gelatoes


Here's a close up look of the die cut sentiments and the patterned paper with the lace. I hope you liked my project. 

See you all soon!

Love,
Dolly

Supplies available at Lulupu:

Friday 28 August 2015

CASE this Sketch - Cards

Hello Everyone!!

This is Manu here and I hope this month you have had flaunted all your Cute baby creations, as this month it's all about the little teeny tiny ones! Checkout about the challenge here

Another good news is!! Lulupu Store will be back with a bang in September. In addition, Lulupu is accepting pre-orders!! And this gives you enough time to get all your crafty wish list on your hands!! Do remember that the pre-order closes on 30th August and you would need to send an e-mail to hello@lulupu.com before August end to get the pre-order completed! 

It's all about the Babies theme this month, but as we did a little change in the posting model, The second Forthnight is all about one theme that the DT's will be interpreting and giving out reviews, tips, techniques on that particular topic. The topic for this fortnight is CASE the Sketch, and we have an awesome and very simple sketch by our DT member Tanvi!


The sketch can be interpreted in a lot of ways and can be played around with various techniques !
I have made two very simple and minimalistic  cards done with this sketch.


In my interpretation of the sketch, I have replaced the circle with a square and worked around on that base for my cards!!!  The flowers are stamped from a Micia stamp and then colored using watercolor pencils!


A simple Sentiment completes my card!


I so love this one!!! That Orange background color pops up the complete look of the card!! 

I hope you liked my interpretation and would get inspired by the awesome and fab work done by the DT members!!! Do remember to enter into this months challenge here.

Happy Crafting!
Manu

Supplies used from the store:


Monday 24 August 2015

Spotlight Designer - Zalak Amarendra Kumar

Good morning & a very happy Monday to all!
Today we have a very talented crafter over at our blog, who plays along our challenges regularly. She has a post packed with information & also a video for us. Please welcome Zalak - 

First of all i really want to Thank you for giving me this opportunity to design and show some of my creativity through your blog.
I hope you will really enjoy and like my tutorial. So lets get start.

1. Tell us a little about yourself and your family.

I am from an Ahmedabad city, graduate with Computer Application Degree. Was a working woman but now a successful housewife. I am blessed with a very supportive family and in-laws too. Wife to a Aircraft Maintenance Engineer and we have one cute little daughter, she one and half year old and let me tell you she is so much curious to do work with me when i experiment with my tools, and finally she mess all my craft area.


2. How did you become interested in crafts and what inspired you to start blogging?

As you know every child is in someway an artist but i got this gift from my dad as he is a painter and now he is a Studio Designer. So i used to do sketches, painting. I was also rewarded in intermediate level painting. And then now after marriage we have shifted to other city and i found much time to involve in my hobbies again so i started making cards for my husband and he encouraged me a lot so i slowly learnt much more by practicing varieties of cards to bring my own emotions of love, affection and best of my thoughts in cards.

About blogging, i started when many of my family members liked and then i went online to see how much my creation get response and i was amazed with it. People loved it and encouraged me for more craft ideas and techniques.

3. What are some of your "go-to" supplies for crafting?

Oh its a long list but most of them are My trim and score board, Envelope board, pair of scissors, and of course my favorite pen and pencil.


4. What is your favorite crafting technique?

Quilling is my first start towards crafting but once you start and experiment with watercolors, inks, embossing paste and powder etc...then you just cant stop yourself for more and more of these.


5. How would you describe your crafting style?

My crafting style is i want my project to be simple with detailed and perfect work.


6. How long have you been crafting?

There has always been some short of crafting i have been doing so cant say exactly.


7. My signature style

Different style of cards where you can put your emotions and feelings together.


8. Who are some of your influences? Who has been your inspiration?

I have a long list but first two are my dad and a loving husband. I follow lot of artist few are Jennifer McGuire, chari moss, Brandy cox and many more. and husband.


9. When not crafting , what keeps you busy?
When not crafting i am fully dedicated to my daughter.

10. What are you currently working on?

I am currently working on twist of watercolor and embossing techniques.

That's all about me. 

Lets get start with the tutorial i have made for you guys. Hope you enjoy.

Tutorial:
Today I am sharing a beautiful card on this month challenge theme. As you all heard about Explosion box so i have just tried my hands with little bit techniques of embossing and a explosion card. Yes…. You heard right i am sharing an Explosion card with embossing techniques. So here you go…
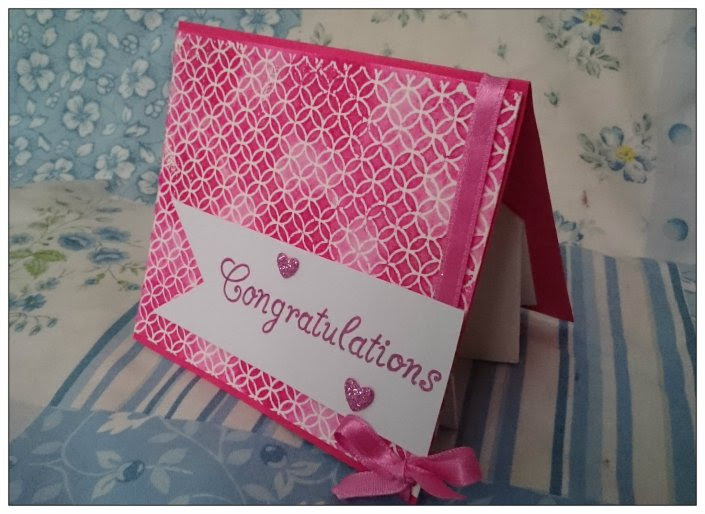
DSC_0266
At first glance you might think this is a simple card. Well that’s the plan so that once its opened you get a surprise  when it folds out.
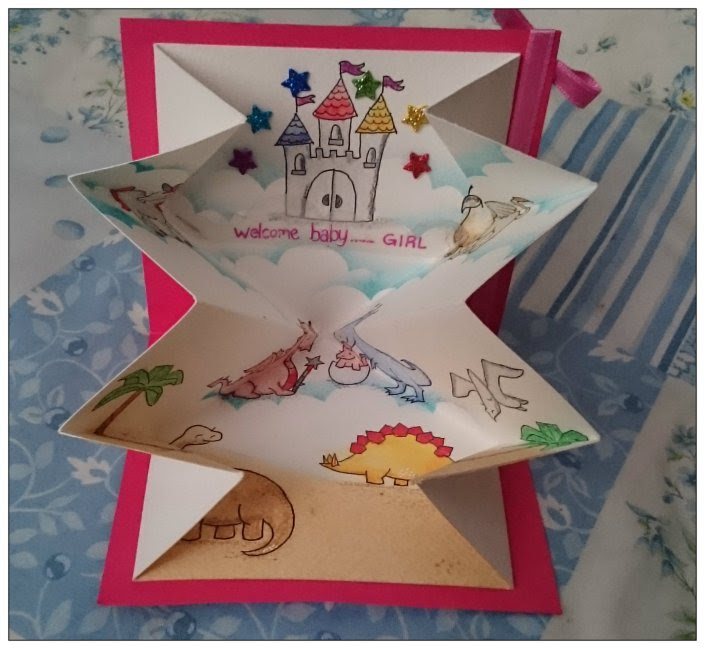
DSC_0268
You get some idea of the exploding part from the above picture.
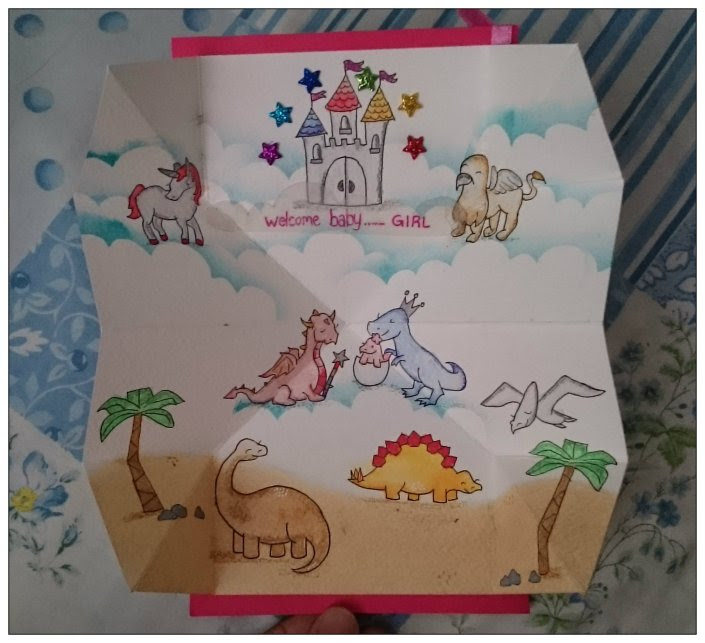
DSC_0269
This is almost fully opened. Its a one layer wonder inside so that it fold easily.
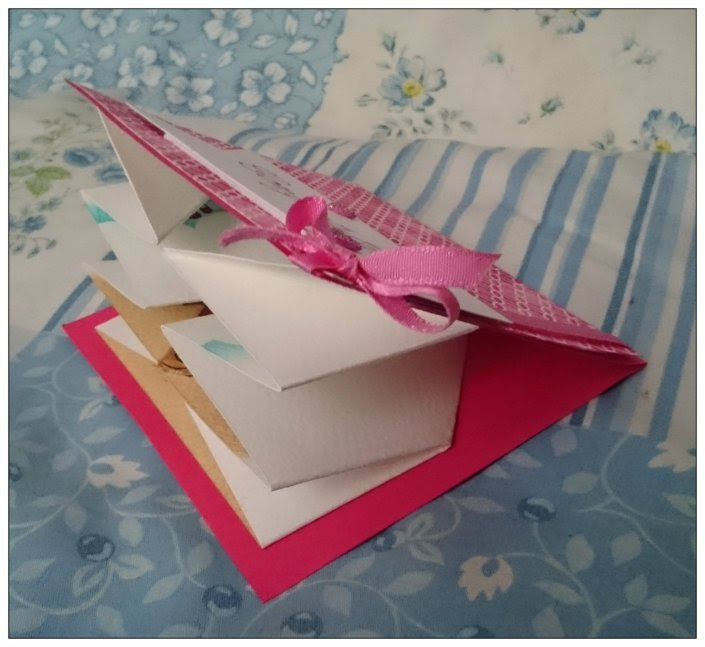
DSC_0267
Another view. It really is very simple to make. The actual folding part is very quick to do and how long you spend making it would depend completely on how detailed you wanted to make the design inside or out.
So here are few base steps to make this card.
Step 1: you will need one 8 1/2 square white paper (i have used watercolor paper, you can use as per your project), one 10×5 inches cardstock and fold in half, and one 5×5 inch cardstock (again i have used watercolor paper to use embossing technique)

Step 2: for embossing technique


I have used small pattern rubber stamp, first stamp it with versamark ink and then apply clear embossing powder on it, you can tap back side of paper to remove excess powder. Then you need to melt embossing powder with heat gun, once it melts you can apply any Distress Ink (i have used pickled raspberry). Then here comes the fun part, take your mister and mix some perfect pearl powder in it and shake well to mix it properly, then spray on cardstock as many times you want (i sprayed it at least 10 times and when it still wet i took dry tissue paper and dab it some spots to remove ink). Now it times to wait till it dry. Please note at this time do not use your heat gun to dry ink fast as it may start melting your embossing powder.

Steps 2.1: (optional, but i think you should try) when ink completely dry you can take your iron, put your cardstock in between of two blank A4 paper and just iron your card at least 2-3 times by changing upper A4 paper, it will start melting your powder, remove excessive ink and it will shine as we have used perfect pearl.
Step 3: for explosion card

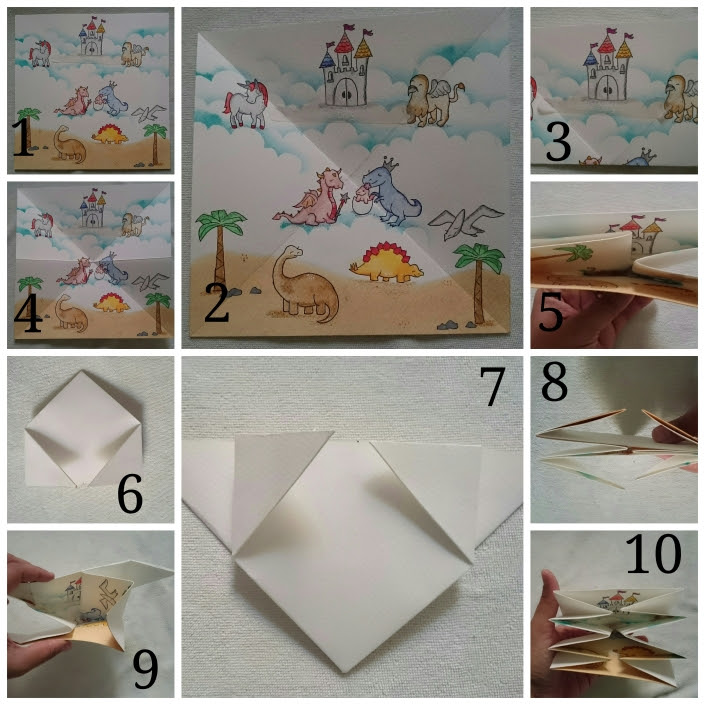
Now take your 8 1/2 square paper. Design your card (i have design it as per this month challenge theme with watercolor and distress ink). Once you satisfied with your project, its time to convert it into explosion. Follow below image.
collage_20150819195707956
Image says (1,2) fold your card diagonally so you will get X shape card. (3) flip your card, your card should facing back side up. Now take your card and fold it like down to up side, so you will get X shape with horizontal line. (4) open all flaps, now you have your card in a square shape with X and horizontal lines. (5) when you fold your card (design facing top side) you will see it will automatically fold and gives you upside down triangle 🔻.  (6) you need to take ruler and mark at 4 1/4 both sides. (7) now pay attention, take your triangle right side  corner and fold outside till you mark. Same you do it for left side also. (8) follow step 7. (9) now open all small triangles which u just folded and fold other side (i.e inside). And open it too. Now you are back with upside down triangle but with folded vertical lines. (10) now push all small triangles inside and secure it with bone folder. And here you go your explosion card fold is ready. You can see video for more clarification.
Step 4: Now you can decorate it with embellishments. Always decorate after folds because now you can see where to put embellishments. (i have not decorate it with more embellishments as i want to highlight my theme.)
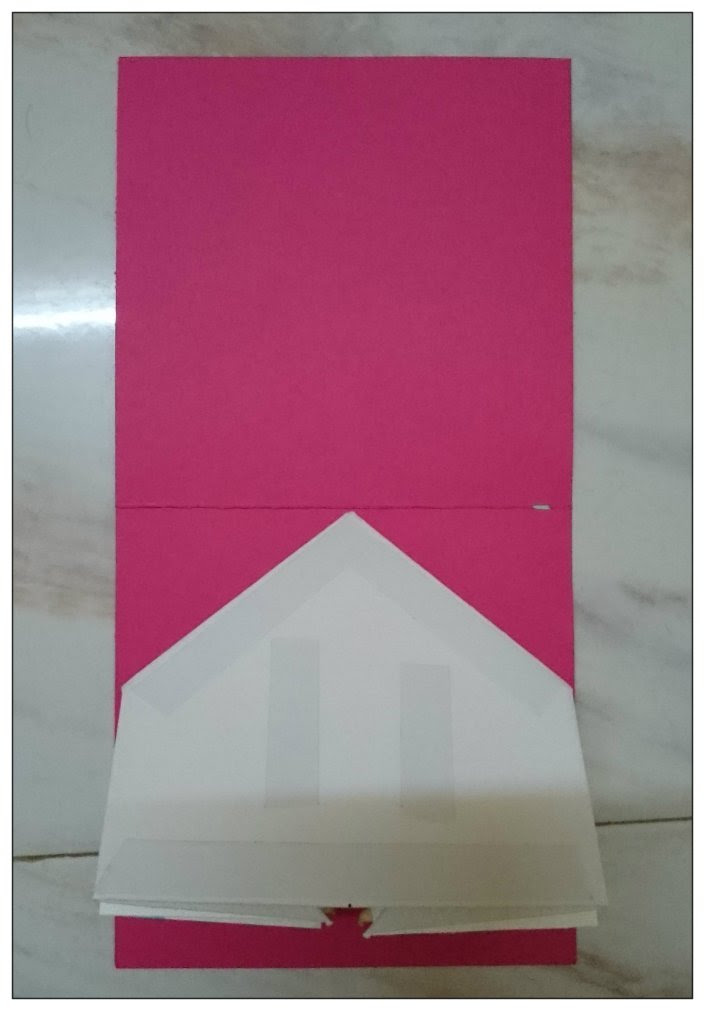
Step 5: adhere it to your 10×5 inch flip top card. Adhere it from where your card folds like below image.
DSC_0251
And your explosion card is ready. You can add as much detail or keep it as casual as you like. I hope I’ve inspired you to give this a try, it makes a really fun card.
Thanks for looking.
handmade Cards by ZALAK 

Thank you so much Zalak for sharing so many techniques with us!

Remember you still have time to enter the current challenge - BABY - A little bit of heaven.

Cheers,
Tanvi

Friday 21 August 2015

Spotlight Designer - Ramya Anand

Good Morning! 
This month we have Ramya Anand guest designing for us. Ramya's creations are warm & cheerful & she has a knack of using bright colors with ease! 


So over to her now - 

Hi Lulupu team,

Thank you for inviting me as the guest designer of this month!! This is very special to me as this is my first Guest designer post for any blog. 

1. Tell us a little about yourself and your family.
I hail from Coimbatore ( Tamilnadu) and have completed M.tech in electrical and electronics engineering. After marriage I got settled in California (US). My mom also loves to make crafts and jewellery. Both my parents motivated me to do lots of crafts right from my childhood. Now am also lucky to get a husband who respects my work as much as I do and doesn't bother about the house becoming a mess due to crafting.

2. How did you become interested in crafts and what inspired you to start blogging?
I have been a creative person from my childhood. I used to get immense pleasure sending handmade cards to my relatives on special occasions. My mom and me used to make lots of decorations for Navarathri. The feedback and the appreciation that I got for my creations motivated me to keep my crafting alive. After marriage I got settled in US . To overcome my boredom I began to craft regularly. Seeing my interest my husband suggested me to start a blog.

3. What are some of your "go-to" supplies for crafting?
Hmmm ... Distress ink pads, Hot glue gun , flower punches etc

4. What is your favorite crafting technique?
Not one I have three favorite techniques. 
1. Jewelry making: I love to wear the jewelry designed by me matching my outfits.
2. Altered art: The joy of recycling an item and creating something new out of it.
3. Mixed media: ( My recent love).. .I love mixed media for the suspense and the freedom it gives.

5. How would you describe your crafting style?
When I see a challenge theme I frame a basic idea in my mind and start researching about it. I love projects that involves a lot of challenges to me so I will zero down the most difficult project. In the process of making that project I learn a lot of things. Even if it didn't come as I wished I will get the satisfaction that I tried something new.

6. How long have you been crafting?
Serious crafting began 2 years ago.

7. My signature style
Bright and bold colors with lots of flowers describe my signature style. I love to add lots of embellishments and flowers to my craft.

8. Who are some of your influences? Who has been your inspiration?
For jewelry making I would choose colors and designs from Indian sarees. For mixed media i will refer to Shilpa Nagaonkar , Jaya Raghuvanshi and Gabrielle Pollaco. I will also refer to the magazine called Paperhaus for layouts and canvas works. For writing an interesting post and lots of altered art ideas I refer to Rupa's blog. Recently I started following Marjie Kemper for her art journals and Catherine for card making techniques. 

9. When not crafting , what keeps you busy?
Playing badminton with friends, Zumba dance classes, playing piano and reading magazines.On weekends I will go long hikes with my husband. 

10. What are you currently working on?
Am currently learning different art journaling and mixed media techniques. 

Thank you Ramya & now lets head over to the cheerful inspirational tutorial she has for all of us.


For making this project materials needed are:

1. Empty tissue rolls (2)
2. Floral wire thin and thick
3.tissue paper
4. Hot glue gun
5. Paints
6. Crepe paper for making flowers
7. Materials for decoration like lace , pearls etc

Procedure:


Step 1: Cut two circular pieces from tissue paper rolls and wrap it with tissue paper.


Step 2: Twist two floral wires and cut them into small pieces such that it fits inside the circular piece. Wrap it with the tissue paper and glue it to the tyre. 


In a similar way make three tyres.


Step 4 : Take a thick wire and join the two small tyres. Using the same wire make the handle and the front of the cycle ( as shown in the pic above)


Step 5: Glue the front portion of the bicycle to the front wheel. Join the front and back of the cycle using a thick wire.

Basket and flowers:

I made the basket by weaving 4 strips of paper. 


The flowers are hand cut as my punches doesn't support crepe papers. 

Painting and other tips:
Since the bicycle is made of tissue paper use dry brush technique for paining it. I used fevicryl acrylic colors. 
The bicycle cannot withstand weight so do not try to add more embellishments to it. If you want a more sturdy bicycle you can use empty tape rolls. But I felt tissue paper roll is easy to cut and hence I tried making with it.


For stability you can tie floral wire at the joints as shown in the above picture.


So a mini bicycle is ready to decorate your craft table!! Hope you all like my craft!! 


Wow Ramya this is absolutely adorable. Thank you so much for the tutorial!

Remember you still have time to enter the current challenge - BABY - A little bit of heaven.

Cheers,
Tanvi

Wednesday 19 August 2015

CASE this sketch - CAS card

Good Morning friends!

As Kripa mentioned in her post here, this fortnight the DT will play around with the same sketch to highlight how it can be interpretated in different ways. We were amazed at the variations we all created not just wrt the shapes, size & colors but techniques too!
Kripa shared this  gorgeous mixed media page & I have  a CAS card today! 


For the card I have retained the circle shape & replaced the quote with a die cut word.


Join me as I walk you through the  card making steps 

These are some of the supplies I used - 


To create a circle template for the ombre stamping, die cut a circle in a copy paper measuring the same size as the card front (4 1/4 x 5 1/2"). Using masking / washi tape adhere this over the front of the card. Since I have repeat stamping of a sentiment  I marked the lines as a guide. The Tim Holtz ruler was perfect for this.


For the ombre effect I used the color box Q (misty meadow) ink pads. 


Once I was done with the stamping I carefully erased all the pencil lines. I loved the pleasant ombre effect.


 The sentiment says 'thanks for being such a great' & I wanted to add "teacher" to complete this. I stamped the word twice (the darkest inkpad in the set & archival black) & then die cut it with the coordinating die. Next I clued both the die cuts, off setting them a little so that a bit of color peeps beneath the black. Glued this with glossy accents on vellum. 


Thank you for visiting us today & remember there is time till the end of the month to link projects for Baby - a little bit of heaven here.

Hugs,

Supplies available at LULUPU.COM


Monday 17 August 2015

CASE this sketch - Memory Keeping (Tutorial)

Hello friends,

Hope you are all having a great month and enjoying the gorgeous baby themed creations that the DT have showcased and also the entries that have been linked. For the rest of the month, the DT will be playing with a sketch and sharing with you all our different interpretations of it. But don't forget, there is time till the end of the month to link projects for Baby - a little bit of heaven here.
 
Today, I'm sharing with you a step by step on how this page was created in my altered book journal.
Our very talented DT Tanvi Shah prepared this sketch. Are you able to see how I was inspired by it. The circle has been replaced with a heart and the speech bubble by the title. When interpreting a sketch, its alright to interchange the shapes and add a few extra elements, while still maintaining the basic look and feel of the sketch. 
 
 
A few days back, I bought an old book from the library and prepared it to use as a journal to record some very special memories. After all memory keeping is not just about photographs. This is the first page I made in this book. You can find many tutorials on the www on how to alter a book, but don't hold back your questions, will be very happy to answer them. Here is a step by step on how this page was prepared. I usually spend 3-8 hours on a layout, this one took about an hour, so a big tick for me to complete this album.
 
1. Start with a layer of gesso. If your gesso is too thick, spread it with an old credit card instead of a foam brush, don't use water as the pages are old and may crumple very easily. On the wet gesso, blend in two shades of pink, I've used fevicryl pearl paint. Now dry completely.
 
2. Open lindy sprays bottles ( product lost at the end of the post). Using the tube tip, draw the outline of a heart. Need not be perfect, intersecting lines give more interest than a traced outline.
 
3. Some random stripes of washi tape. Tear it up so they are not all even width.
 
4. Time to add colour. First rub some gelato on a piece of plastic (packaging of a stamp). Add a tiny amount of water, splat the plastic paint side down on the background. Repeat the same with mists.I even stamped randomly on the page using the leftover paint instead of a stamp pad.
 
5, 6. Layer strips of pattern paper (Heidi Swapp Dreamy) and a doily. Add more colour using the same plastic piece. Do you see the strips with circles punched through? I stuck a few different washi tapes on a strip of scrap paper and punched circles through it.
 
Time for embellishments. Layer some uber gorgeous pieces from Open Book ephemera pack, wood veneer, enamel dots, stickers and more stamping with archival ink. After sticking down the photograph redraw the part of the heart that got hidden behind the layers. Add journaling. All Done!
 
Thank you for visiting us today, come back later this week to see another interpretation of this sketch.
 
Wish you a great start to the week,
Hugs,
Kripa
 
Supplies from the Lulupu store:


Friday 14 August 2015

Baby themed Shadow box !!

Hello Everyone!!!

This is Manu and I'm sharing with you my interpretation of this months uber cute theme! It's all about Babies this month, it's about making some cute and super adorable creations ! Read all about the challenge and the guidelines here 


Babies are truly a little bit of heaven and they are such adorable gummy bunnies that one just gets lost in all the mischief and cute stuff they do!! I sure have awesome time with my tiny tot and I'm amazed at the way they sense and soak in all the teeny tiny details and activities that we do daily, not to mention, Imitate them straight away! Well, my baby is at the stage where she nods her head for a NO for every single thing I say to her !! Sigh...She listens and then does the exact opposite! But She's my happy place for sure, a smile on her face makes me happy to bits!


For this months challenge, I have made a Shadow box for a little baby boy!!
Here's what I did!


Here's how I did it. 
1. Take a shadow box of 12*12 size and any design, prime it with Gesso, I normally prime my MDF objects with primer and sand it a little before applying the base color.
The advantage of applying gesso(primer) is that the base color coat comes up nicely and the exact same, than when the gesso is skipped. When the Gesso(primer) is skipped, the base coat color is always a little darker than the actual color and this might give the same exact color you want for your project.

2. Once the shadow box is primed and coloured, cut out the pattern papers as per the dimensions of each internal box of the shadow box and apply using Mod Podge. 

3. Embellish the boxes as per the way you want the box to have a final look and once the base pattern papers are applied, seal them up again with a coat of Mod Podge!

There you go.. easy peasy!! Isn't it??

Here are a few more closer look at some of the elements !

I totally love those cute teeny tiny booties... You can find the tutorial on the net and they are super fun to make. These booties are all about 1.5 inches (very very small) 


Another place to put up the baby's picture!! We all sure love babies to the moon and back!! They are adorable little munchkins!


I love shadow boxes for the basic fact that they can accommodate pictures as well as messages and is a great option for displaying ! They make for one adorable wall pieces!!

I hope you liked my pretty-all-blue shadow box and do remember to enter into this months challenge here. Do let me know if you liked this pretty one!!


Supplies from the store:


Monday 10 August 2015

Baby Mobile Card + Tutorial

Hello lovely readers, 

Hope you all are having a wonderful start of the August Month. This months theme at Lulupu is a very unique and cute one. The focus is all on the babies! They bring so much joy and love in all our lives, so we decided to dedicate this month to baby related theme. Have you read through Tanvi's post on the theme challenge and how to participate, if no, then hop over to 


I have created a welcome baby card with a mobile hanging inside. Here's how it looks from the front and inside:


For the tutorial, I have a photo snap shot explaining the simple process [Warning: Its a lot of pink in here] 

1. I used an cute baby elephant from Wplus9 - Unforgettable stamp set and coloured them and fussy cut each piece out. You can use any cute image for creating the mobile hanger. 
 2. For the card, I used a 5 1/2 X 10 card stock. I used two of them, since the inside piece (shown below) is used to create the hanger. Fold the cardstock and make two parallel lines, approximately 5 cm long and cut along those lines. 
 3. Fold the cut piece towards the inside to create the hanger (shown below):
 4. For the front of the card, I used the stars from the same stamp set and created a background using some distress ink in worn lipstick shade. I also added a ribbon on the front and added the sentiment welcome baby on a piece of cardstock which was fussy cut and mounted using some foam adhesive.
5. Finally, I strung the elephant images on the inside of the card, using some plain stitching thread. Be careful to hang the images at different lengths to add some interest.  
Once you open the card, you are greeted with these cute elephants turning on every side.

I think this would make a cute idea to create baby cards, since the options are endless. You can use stars, alphabets and any cute animal stamp you have in your stash. 

I hope you have been inspired by this project and do try something cute to link up for our monthly challenge!

Till I meet you all next!

Love,
Dolly


Stuff available at Lulupu:

Wednesday 5 August 2015

An Easel Photo display with Drawer

Hello friends,

Let me start by congratulating the winners of last month's challenge. You can see the winning entries here. We love visiting all of our participant blogs, sharing the joy of paper crafting and look forward to your entries for this month's theme
 
BABY - A little piece of heaven
Click here for the full post and our generic challenge guidelines can be found here.
 
My paper crafting aspiration this year is to try new techniques and styles. When I went through my box of projects, most were mixed media, so for this post, I've tried my hand at a traditional card which involves loads of measurements, both unfamiliar to me.

This what my project looks like.


The pink mat is a magnetic photo mat and can be fixed onto the base paper (music paper) both vertically and horizontally to accommodate any photo layout. This easel drawer photo display would make a perfect gift to new parents, or grandparents to show off adorable new baby wallet size photographs.

The drawer measures 6x6 and has room to accommodate loads of photographs and even a gift. This is the view from the top, with the display lying flat on the box. Because the box was made to a specific dimension, there was a lot of measuring required. The drawer, and base of the card are white medium weight chipboard. The Tim Holtz ruler is perfect for precise measurement and Art Knife by WRMK made cutting chipboard easy.
 
The pattern papers, die cuts, drawer pull and flowers are all Kaisercraft Pitter Patter collection. The banner was cut from left over scraps and the WRMK crop-a-dile punched tiny circular holes just enough to thread a twine.


All the different layers have been popped up using foam tape. Apart from paper flowers, tucked in between the layers is a resin flower . Ive also embossed a stitch stamp around the border of the card.
That's it from me today. I hope you al feel encouraged to try something that not your usual style. You can link your baby theme creations here.

Until next time,
Take care,
Kripa

Materials from the store
Tim Holtz Idea-Ology Design Ruler 12"
Art Knife By We R Memory Keepers
Pitter Patter Kaisercraft Paper Pad 6.5"X6.5" 40/Pkg
Crop-A-Dile Hole Punch & Eyelet Setter
Gold Super Fine Embossing Powder 1oz
 Heat It Craft Tool Europeon Version
VersaMark Watermark Stamp Pad 1
Blossoms 1 Resins embellishments