Pages

Wednesday, 30 September 2015

Sparkle shine- Wall art + Tutorial

Hello friends!!!
Neha here, today I am sharing with you a wall- art along with a pictorial. After a long time (one and a half month) I am back to crafting as due to some personal reasons I had to go out of station. But now I am back and very much excited to try my hand at new things. 
This month lulupu's design team is sharing different tips and techniques to add sparkle and shine in your projects, In this project I have used Glitter EP, Embossing enamel, sequins, glass glitter and glitter glue.

Checkout the guidelines and more about this months theme here


  Here is my inspiration 


I started with some PPs of different shape and sizes and matted them over each other. Used Glitter EP through different stencils randomly here and there. Arranged some die cuts and embellished it. The two big roses are handmade using punches and colored using worn lipstick DI. I just loved the way it turned out finally; super sparkly and glittery. This will be framed now and will be gifted to a friend. I hope she likes it. 

Glitter EPs can be used very easily to add sparkle and bling to your projects and here I have used them with different stencils. Similarly Embossing enamels can be used to decorate your mdf embellishments and trust me they look much more gorgeous afterwards. Glitter glue like stickles can be used over floral embellishments and Prima glass glitter can be used with metal charms, resin frames and as it is over the surface using glossy accents or gel medium.  

Some close up pics.

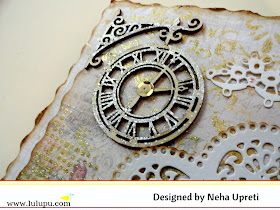
Mdf embossed with embossing enamel


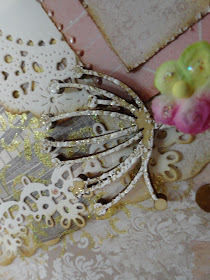
I have used stickles glitter glue over handmade roses and glass glitter around the flowers using glossy accents


Well now here is the step by step tutorial along with pics.

1. Take 4 pattern papers of your choice (size of larger one is approx 10*10"). I have altered the edges of two big ones using designer scissors. The edges of smaller ones have been distressed with the help of scissor. 


2. Distress all  of them with vintage photo DI and stick three of them over each other as shown in pic.


3. Next dab Versamark watemark ink pad through a stencil and emboss it with glittered Golden EP. I did this randomly using two different stencils.


4. Arrange some die cuts (distress them with vintage photo DI and place the next PP (this comes below photo mat)


5. Take some mdf embellishments of your choice and heat emboss them with Frantage shabby chic embossing enamel. This adds a very sparkly effect to them. 


6. Now embellish your layout with mdf, flowers, pollens etc. I have also added some glass glitter from Prima (using glossy accents) near the floral arrangement and some golden sequins.  
Your super glittery and sparkling wall frame is ready!

Hope you like it!!! Today is the last day to link your entries for the current challenge and you can do it here


Supplies form store:

                                                         Gold Essential Sequins

Friday, 25 September 2015

Spotlight Designer: Nikita Azad

Hello Everyone!!!

This month it's all about that sparkle and shine to shine brighten your projects!!! YES, it's the Sparkle and Shine theme this month and I'm very excited as we all love a little sparkle along our way!!

It's time to have another Guest Designer here at Lulupu and this time around we have someone who needs no introduction and yes, she has also been a former DT member and Blog Co-ordinator with Lulupu. We have Nikita Azad making a lovely card for us today. 
Lets checkout a little more about Nikita, before we see what she made for us!


Hello everyone, I am so glad to be back here. :)

1.       Tell us a little about yourself and your family.
I live in Mumbai with my husband. I have been crafting since 2011 and loving it. I also love to write and currently, I’m adding finishing touches to my first novel.

2.       How did you become interested in crafts and what inspired you to start blogging?
It started when I bought a Beginner’s Quilling Kit. To learn more about Quilling, I followed many crafter blogs and accidently stumbled upon card-makers and scrapbookers. Lulupu (then known as the Crafting Queen Store) was my first shopping stop for craft supplies in India.

As far as blogging is concerned, I started blogging in 2009, but it was more of a diary. I wrote about my experiences, a few short stories and poems. So I knew what blogging was. I started my craft blog in 2012 (or ’11, I don’t remember exactly) but I didn’t post there regularly until 2013.

3.       What are some of your "go-to" supplies for crafting?
Sew Easy tool and Washi Tapes. Ironically, I have used neither in this project. Die cuts are my new favourites too.

4.       What is your favorite crafting technique?
I love layering and Stitching.

5.       How would you describe your crafting style?
This is the question I am most afraid of, because I don’t have a clear answer for this :P
I would say my style is a mixture of a couple of things because even though I don’t do multiple layers and shabby chic, it’s not completely CAS too. Now you all decide what you want to call that ;)

6.       How long have you been crafting?
I first started crafting in 2011. I took a break last year around June to finish my book and have been crafting since February this year again. :)

7.       My signature style
I have no signature style because I mix a lot of styles in my work. I don’t know if that’s a good thing or not.

8.       Who are some of your influences? Who has been your inspiration?
When I started out, I watched a lot of videos by Gina K, Kristina Werner and Stephanie Barnard. So even though my style is nothing like theirs, I did learn a lot from them. And then there are our fellow Indian crafters, all of them, who influence your work in some way or another because even though you don’t consciously remember, somewhere, something you’ve seen does inspire you to make something of your own.

9.       When not crafting , what keeps you busy?
I write, I read, I binge watch TV (if I’m not sleeping) and I sleep. And if I still have some time left, I manage to do some housework too.

10.   What are you currently working on?
On the crafting side, I am currently mostly on DT commitments. Other than that, I am working on Query Letters to send to Literary Agents who will find me a publisher. *fingers crossed*

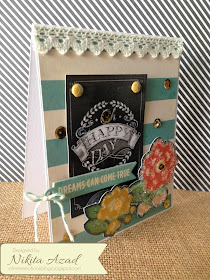
Today, I have a nice little card and a quick video (yes, video!) for you. Here’s what I have made.


In the video, I have focussed on using UTEE (Ultra Thick Embossing Enamel) and Twinklets Diamond Dust.


For more sparkle and shine, I have used glittered brads..


...and sequins
...and stickles glitter :)


Here are some more pictures


Here’s the video


That’s all I have for you all now! I hope you found the video useful (and the card inspiring :P)

Thank you so much for having me here. It’s always such fun.

Until next time!
Love,
Nikita.

That was one awesome card!! Thank you for joining us here today and Glad to know a little more about you!

Happy Crafting!
Manu


Wednesday, 23 September 2015

Sparkle & Shine - Cards

Good Morning!


This is Tanvi & I have three cards with stencilled background  to share today. I have used different medium to add sparkle to these - Inkagold & sequins, glimmer mist & glitter paper.

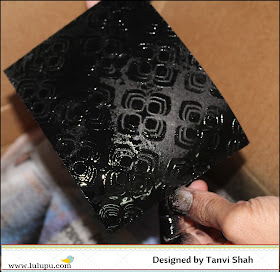
For the first card I created the background with texture paste on mistable paper.


Next I misted Tattered angels black to make the card base black.


Let it dry & then buffed Inkagold over the surface. Trimmed it to make my card. The sentiment is heat embossed in gold & the sequins add the extra 'Wow' !


For the second card made similarly I used glimmer mist (jack frost) for the subtle shimmer.


And finally in the last one, glitter paper strips on the edges just make the ombre blue background pop! Used chalk colors for the background & the butterfly was heat embossed on vellum & die cut with a coordinating die.


The current challenge is - Sparkle & Shine & you still have a few days to link your entry. You can read more about the Sparkle and Shine challenge here

Supplies available at LULUPU.COM


Tuesday, 22 September 2015

Sparkle and Shine - journal book page

Hello friends,

Hope you've all had a great start to this week. 25 gorgeous entries this month, there is time for you to add another if you want. You can read more about the Sparkle and Shine challenge here.

Here is my contribution to your daily dose of art inspiration - another special memory recorded in an altered book journal. Memory keeping isn't always about photographs (at least for me), its about documenting those little things that bring me joy everyday. My page today is about something I learned from my little boy!

The background was prepared by using gesso and a tiny bit of paint. Paper layering on both pages have been made using the gorgeous Maggie Holmes Open Book paper and ephemera. There are so many pretty patterns and text, I'm in love with this range and just can't seem to stop creating with it. Finally, to finish some studio calico sequins have been added between the layers. Easy isn't it.

Wont you join us this month with a sparkling creation of your own?

Supplies from the lulupu store:
Modelling Paste - Sakura Acrylic Tube
 Maggie Holmes Open Book Paper Pad 12"X12" 48/Pkg
Black & Gray Essentials Sequins 8mm 6g
Aleene's Tacky Glue Clear 4oz
Koi Water Brushes Medium
Ephemera Cardstock Die-Cuts 81/Pkg
 

Friday, 18 September 2015

Sparkle and Shine - CAS cards

Hello Everyone!!!

This is Manu here and I hope that this month is giving you all the more reasons to sparkle and shine!! Well, yes, this months its all about blingy and sparkly projects!!

Checkout the guidelines and more about this months theme here

Here's my take on the challenge and yes, I have make 2 new cards for this challenge!! 
Lets check out what do I have in my kitty today

I have made two very simple cards and I have been trying my hands at CAS cards from sometime and Lulupu's projects are giving me a perfect opportunity to try these out!!!

I am always a go for the stripes pattern and when I opened up my DT kit from lulupu this time, I knew I had to use this stripe pattern paper, they make such a striking backgrounds!!! 


There's a tip used in this cards which I had learnt while I was browsing the internet sometime back! I do not remember where exactly, but since I was working on a couple of projects that involved glitter alphabets, it was useful for me. Since, I was working with glitter Foam sheets and with time and usage, the glitter fells off the projects, using Glossy Accents or Mod Podge Dimensional magic works wonders and will never let the glitter fell off!! And that was one quite useful tip for me!!!

My other card is also a CAS card and you must have had guessed by now that I'm totally in love with the Altenew stamps!!! This stamp set is known as persian motifs and is such an adorable one!

 After stamping the motif, I coloured it off using watercolors and then added glitter using wink of Stells, GOLD glitter pen along the edges! This gives a very subtle shine to your projects when you want then to shine ,yet being very sober in doing so.

I hope you all liked my cards and do not forget to join us in our this months challenge here. Do leave me some love if you liked these pretties!!

Happy Crafting!
Manu

Wednesday, 16 September 2015

Spotlight Designer - Riswana Fathima

Hello Everyone!!!


I'm sure that this months theme is giving you the edge to think about all those sparkly and shiny things you would like to incorporate in your projects and make then dazzle with shine!! Well, it's all about shine and sparkle this month.. right!!!

We have a very talented crafts person at our blog today and she's a lot regular in our challenges, Please welcome - Riswana


Hi crafty friends.. I'm very much delighted to be here amongst you. Thank you so much Team Lulupu for giving this wonderful opportunity of being a guest designer..

1. Tell us a little about yourself and your family.
  I live in the district of Thirunelveli, TamilNadu, the southernmost part of our country.. I've completed M.B.B.S and started working in a nearby government hospital 6 months back.. 
Still single and happily enjoying life, doing things I love :)


2. How did you become interested in crafts and what inspired you to start blogging?
  Art has always been an essential part of my life for as long as I can remember.. 
When it comes to paper crafts, I got very much interested after watching videos of Vicky Papioannou's art jounal layouts & Gabrielle Pollacco's mixed media works.
When i was searching online for craft supplies stores in India i stumbled upon Dr.Sonia's blog & it opened the whole new world of blogging to me..
Her blog is a treasure of information for any crafter...


3. What are some of your "go-to" supplies for crafting?
       There are lots.. I use my trim&score board, distress inks, waterbrush, embossing powders, stamps & fineliner pens quite often..


4. What is your favorite crafting technique?
     I always like to learn and explore new techniques..I give a try with many of them from CAS cards to mixed media altered art projects.. Art journalling has been my most favourite part of crafting so far..


5. How would you describe your crafting style?
       I love to sketch and draw & i always try to incorporate that in my works wherever possible.. I usually make a basic plan before I begin any project & try to work according to that.. But many a times I get carried away and end up with something totally different :)


6. How long have you been crafting?
         I've always been crafting in some way or other since childhood..  Paper crafting started a year back..


7. My signature style
          Haven't settled down to one yet. Still experimenting & in the quest of finding my own style.


8. Who are some of your influences? Who has been your inspiration?
        There are many awesome people who have been a great source of inspiration to me. My grandmother has been the first big influence.. We share the passion for crafts & her curiosity to learn new things even now always amazes me..
I'm addicted to watching youtube videos on arts & crafts.. Vicky Papioannou, Gabrielle Pollacco, Kristina Werner, Jeniffer Mcguire, Nichol Magouirk, Sandy Allnock, Nika in Wondeland,Tim Holtz, Mark Crilley, Vamos Art to name a few..


9. When not crafting , what keeps you busy?
     Work mostly.. Also, We are kinda a mini joint family, so there will always be many people around & time just flies by :)
I love to hangout with friends, Travel & photography when I do find the time.


10. What are you currently working on?
           Am working on my new project "1 image N techniques" wherein I'm trying to approach the same image with different colouring techniques. Quite excited about it :)


Here's another fun altered art project i made :)


It started with an empty conditioner bottle ;) 

I covered the whole bottle with scraps from a very old novel ( I got a set of 5 books for 5 rupees in Pondicherry!!) With mixture of equal amounts of PVA glue(i used fevicol) and water.. I find foam brush works best for this..


Then wound a packaging hemp twine around the neck of the bottle giving a good coat of glue to avoid frizziness & seal all the fibres in.. I added gesso randomly over the surface.


I used Dylusions paint (vibrant turquoise, fresh lime) to paint the bottle in random patterns blending all the way with a wet baby wipe.. Added some white gesso splashes.
Did some random stamping With kaisercraft texture stamps (faded dots, geo) & also the sentiment from Inkadinkado stampset with black archival ink..
Gave a coat of Mod podge gloss to seal the whole surface & to add that little shine..

For the embellishments, i made the flowers using the paper from the same old book following the classical paper flower making technique.. Inked on both sides of paper using distress inks (mowed lawn, broken china, peacock feathers) applied gel medium (camlin) to seal the ink..Then Cut a spiral out of it with Faber castell scalloped edge scissors & rolled into a flower..

Added a twin bow made of the hemp twine & a metal charm..


The big flower is made out of Papericious Teal Steal patterned paper collection with WRMK flower punch board.. (XS & XXS size) secured with a brad.. For the stem, Stuck green tape around a bendable wire & attached the loop to the brad.
 . Hence the flower sways beautifully which formed the inspiration behind the quote "Dance to your own music" :D


I hope you liked it & the steps were of some help :) I would be glad to hear ur thoughts on this :)
Thanks again for the chance..
Create. Have fun.

Wow, that was one awesome transformation!!! loved the altered look and feel of the complete bottle!! Thank you for sharing your lovely creation with us.
Do remember to enter into our current challenge here

Happy Crafting!
Manu

Thursday, 10 September 2015

Sparkle and Shine - Coffee Cards

Hello mateys,

How has the week been progressing for you? Its getting warmer here in Sydney, spring is in the air and in my mood. This month Lulupu's challenge for you is to create a project with
There are so many products that you can use to add some shine to your projects - the good old rhinestone, sugar dots, more trendy sequins, glitter. Don't forget Heidi Swap colour shine mists, ranger perfect pearls, wink of Stella..... the list goes on.
 
Today I want to share 3 cards with you all, mixed media style of course. All of them are made with Prima Coffee Break papers, wood embellishments, stamps and medium.

The background was prepared using strips of torn paper, gesso, a bit of lace, stencilling using the prima bubble stencil and finally a sticker from the same collection. Watercolours were added after that and finally when everything was dry, mix glass glitter with gel medium and apply. Gel medium dries clear, meaning you can see the paint and layers underneath giving a very interesting effect.

For this card, start by applying 3d gel through prima stencil, before the gel dries, sprinkle glitter over it. You can combine two or more glitters too for more depth. Allow to dry completely, else the glitter will stick to your fingers and come off. Places where the glitter didn't stick, the 3d gel medium gives a see through embossed kind of effect.
My final card is very simple. Ive used the traditional rhinestone to add colour to an otherwise coffee coloured card.
The Lulupu store is open again and brimming with new supplies. Have a browse through and you may get more ideas of products that sparkle and shine to use in you creation.

Supplies from the Lulupu Store:
FaberCastell Mix & Match Color Gelatos Set Tropical 4pc
Bubbles Elementals Stencil 6.5"X10.25"
Archival Dye Ink - Jet Black
Broken China Distress Ink Pad
Coffee Archival Ink
Coffee Break Paper Pad 6"X6" 30/Pkg
Martha Stewart Glitter Tinsel Iridescent 12pc
Coffee Break 3D Stickers